Wednesday, April 25, 2012

More Photos for Stamp Organization

Sheri left a comment asking to see my bins.

So I thought I'd post more photos with less writing....

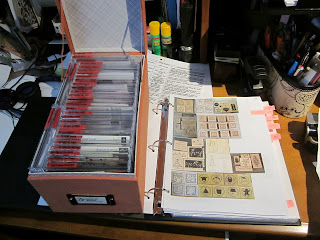
I use these Martha Stewart CD bins (discontinued) to store my unmounted Stampin' Up! stamps:


I've labelled them (yes I will be redoing the labels) and numbered them - the number corresponds to pages in my stamp binder.

Each bin holds 30 CD cases.

I print off 1 page of stamp images for my stamp binder and
another I fold lengthwise and put in the stamp bin.
If the stamp set in the CD case is missing an image sheet then I print off an enlarged copy of the image and include that in the CD case.  Most of my stamps are older and were missing image sheets!
For my non-Stampin' Up! stamps that are still wood mounted I use a different system.
I keep them in Stampin' Up! snap cases (recycled from my unmounted stamps!)

I labelled them by theme and added a code letter.
I pack the case tightly with stamps!

Keeping the lid on I place the stamp case on my scanner/printer/copier and copy it 2 times.
1 copy is trimmed and included in the case so I know what stamps are in there but  more importantly what stamps need to go back in this case!
The second copy is hole punched, labelled with the case code letter and inserted into my stamp inventory binder.

It's so easy!!

As for my clear polymer and rubber cling mount stamps I use a combo binder & bin system. 
I'll share more of that another day when I finish the inventory!


OMG! I finally have a Stamp Inventory Catalogue!

I've been accumulating Stampin' Up! stamps for over 8 years.  I quickly ran out of space for all those cases of wood mounted stamps so I started unmounting my stamps and wheels!

Click HERE to see that post.

I now have 11 bins (that hold 32 CD cases each) of Stampin' Up! rubber stamps (mostly retired).

Plus a TON more loose non-Stampin' Up! stamps.

Sadly I wasn't using my stamps because I had no way of knowing what I had in the bins and I didn't keep the image sticker if it was already stuck on the wood block.

So after reading Kate's amazing craft room cleanse journey I decided to tackle these stamps and get myself more organized.

First I sorted ALL my stamps by theme.  Then I created an inventory sheet (in MS Word) for each bin and printed off a duplicate to keep in my new stamp binder.

To create the inventory sheet I scanned the label sheet for the stamp set (for ones I never mounted them on wood blocks) .  If I don't have labels I look for the images on the internet and insert that image (if I'm lucky an image of label sheets) into my document.

If my CD case is missing the image sheet (because it was a mounted stamp set and I threw out the labels stuck on the wood blocks) I print off a larger image or as true to size as possible and put that in the CD case with the stamps.

Here's what my Stampin' Up! stamp inventory page looks like:


Nothing fancy but it gives me an idea of what I've got and where it is!

For my non Stampin' Up! wood mounted stamps I created similiar inventory pages (in the same binder).  I sorted the stamps and put them in snap cases by themes.  I used my labeller to label the theme and then a code on the side of each case. 

I used my printer/copier to copy the top of the case (without taking the stamps out) and I printed out 2 copies.  One for my binder and the other I trimmed and inserted in the stamp case.  This gives me a quick "snapshot" of what's in the case and what should go back in that case.

I can flip through this binder and get a good idea of what I've got and hopefully find what I'm looking for.

Next I'm going to tackle my clear and rubber cling mount stamps!  I just need to inventory them - I've already sorted them and put them in bins (SU!) and binders (non-SU!).

Until Next Time!
Marie

Tuesday, April 24, 2012

New Blog Template

I'm trying out this new blog template. 

Not sure if it will stay...

Until Next Time!
Marie

Tuesday, April 17, 2012

Getting there...

April 17, 2012

Last night I loaded up my thrift store spinning thingy with my technique swap samples. 

Now all I need to do is give it a spin to be inspired to try a new technique!
Over the weekend I made a quick dash out to IKEA and picked up a couple of kitchen racks to accomodate more punches.  See the new longer rack on the very bottom?

I added a smaller one here for more punches and I found a space for my flat SU! punches too!
I was a bit bummed that they didn't have the same kind of rack as what I started with but this style is ok and with all the punches you can't really see the rack!

I also finished my mother-in-law's birthday gift - I made her a bronze and gunmetal chainmaille bracelet. 


Until Next Time!
Marie

Thursday, April 12, 2012

More Organizing!

PUNCHES
Even though I have lots of Sizzix Dies and Nestabilities I still like to use punches.  They are quick and convenient when you have space to store them properly!

I've outgrown my current storage system - I thought I had this under control by using these IKEA racks to hold my "mostly used" punches
and a "behind the door" shoe holder for my border punches and new Stampin' Up! flat style punches.


I love having my punches out in the open like this but now I've run out of room and have gone back to putting punches in drawers.  And they don't get used if they're not in view!

I've cleared a space on my desk and I'm thinking of adding a 3rd row IKEA rack (on the right).  Unfortunately IKEA doesn't sell the kind I bought anymore so I'll have to find one similiar. 
OR maybe I just need to get rid of some of my punches? 

RIBBON
I have so much ribbon you would not believe it.  I admit it - I'm a ribbon hoarder!
I won't even show you how much ribbon I have but I will show you how I store my "mostly used" ribbon.

I have 3 Making Memories Embellishment centres but I choose not to use the ribbon dowels. 
Instead I use these Store In Style Ribbon Spool Stackers and sort my ribbon by colour or theme.


I like this pant hanger idea but I can only use 2 of the 4 rods!

I just used one that I had at home but if you're shopping for one of these I would suggest you take some spools of ribbon with you to test out the space between each rod.


This is only a small fraction of my ribbon "collection" and if I wanted to really organize it I would need one (or more) of these bad boys. 
 Isn't this amazing!! It's made by Patty and her husband.  Click the photo to read more about it.
You can keep it out or slide it into a cupboard (if you had an empty cupboard that is!).

OTHER EMBELLISHMENTS
For other embellishments I use these Making Memories drawers which fit perfectly in the Embellishment centres.
I also use these clear plastic craft jars (large and small)
but mostly I keep my embellishments (stickers, rubons, glitter, brads etc)  in Best Craft Organizer drawer units like this.

STICKLES
I really like how Shannon stores her stickles using a cookie sheet and magnetic circles. Click the photo to read about it on her blog.

Stickles storage

But I don't have a lot of Stickles or Glitter Glue bottles so I just needed something smaller. 
I used to keep them on my desk top but in an effort to clear some space for another punch rack I opted for a Best Craft Organizer Dazzle Caddy.  I got mine at Scrap Arts and I use both the base and the lid to store my glitter bottles.


If you have any suggestions to help me (and others) with storage ideas for punches, ribbon, or embellishments please leave a comment.

Until Next Time!
Marie

Spring Fever - Organizing time!!

I've been trying to de-clutter my craft room for the last month or so but it's such an overwhelming job that I keep stopping and starting.

And I've got a few other things on the go right now that keep pulling me away from this task.


Last night I went through my loose wooden stamps (yes I still have some on wood blocks!) and I pulled out a quite a few (this cupboard was full!) but I'm still keeping so many. 

I kind of forgot what I had - out of sight out of mind I guess!

Makes me wish I had kept a catalogue of my stamps from the beginning or finished the ones I tried to start over the years.

When I get overwhelmed in my craft room I move into other areas of the house to de-clutter.

My daughter is moving out and so I've been going through my whole house to see what I can "donate" to her.  This is really helping me de-clutter!

I've gone through my kitchen drawers, linen closet, and garage!

To help keep me motivated I've been watching some videos and following a fellow blogger as she goes through a  "cleanse" of her craft room.

Click HERE to see an organizing expert tour her super organized condo.  Very motivating but kind of extreme!!

Click HERE to see Justine, a scrapbook consultant, tour her organized craft room.  There are some great tips in this video!

Click HERE to follow along with Kate Palmer on her Sparkle Tart blog as she works on a 30 DAY CRAFT ROOM CLEANSE.

I hope this helps to motivate you to keep your room tidy or re-organize if you need to!

Until Next Time!
Marie

Thursday, April 5, 2012

Happy Easter!

Happy Easter everyone!
My kids are older teens now but I still decorated the mantle and got them a few treats.

Today I saw this house and I thought to myself - THIS is the way to decorate for Easter!


Look at all those Easter eggs on the front lawn!
I wish that I had thought of doing this when the kids were little!!

Until Next Time!
Marie